Thursday, January 21, 2016

BLU CHEESE PARSNIPS RUSTIC POTATOES


Hey everybody! How are ya'll feeling today! Im doing great! I just got out of class where did a olive oil tasting today and learned all about that! It was very interesting! But on another note! I have a easy side dish for ya'll today and it is my B.C.P.R. Mashed Potatoes! Oh and if you were wondering what the B.C.P.R. stands for well just look at the title ha ha! 

INGREDIENTS:
2 Parsnips (peeled and rough chopped)
2 Rustic potatoes (peeled and rough chopped)
1/2 stick salted butter
1/4 cup sour cream
1/4 blue cheese crumbles
s/p to taste
1 tbsp butter 
1 tbsp dried parsley 

Ok first things first. You want to peel and rough chop both the parsnips and potatoes. After you do that then through them suckers in a pot of boiling salted water. Now I know you are thinking "Ok Sayber how long do I cook them for?" Well you want to boil them just like you would any other time you are boiling potatoes! Parsnips are a routed vegetable and cook just like potatoes. The main difference to me when it comes to parsnips and potatoes is that parsnips are more sweet and have a taste of a potato/carrot. 


So after y the potatoes and soft and fork tender then you want to transfer them with a slatted spoon to a bowl where you are going to start blending with a hand held or stand mixer. Next it is time to add the fun stuff!

Through in the next 4 ingredients and then blend baby blend! NOTE: at this point you want to put you oven on broil and then place your cast iron skillet in the bottom of the oven to get hot. be careful!


You want to blend until the mixture comes to a soft and whipped constancy.

Now it's to burn! You want to then take out your hot cast iron skillet that was heating up in the oven. Drop the 1 tbsp of butter and watch it melt! after it has melted then add the mashed potato mix to the skillet. I like to make little ocean waves so the parts of the mashed potatoes that get crispy show! Ok pop that sucker in the oven that already on broil. set the skillet in and it only takes a minute for the top to start crisping up!take it out of the oven carefully and then sprinkle the dried parsley on top and its all good and done! 

"Love and Good Eats"
-Sayber


Tuesday, January 12, 2016

Famous Buttermilk Yeast Rolls

I know your mouth is salivating just looking at my yeast rolls ha ha and its OK because after you read my recipe on these babies you will be soon making your own but, first I  want to share a story. Want to hear it? Well here it go! 

I remember the first time I made yeast rolls and it was when I stayed with mom in Muskegon, Michigan and we were leaving a duplex upstairs with my moms church friend Joyce. It was a night my sister and I wanted to go to the movies. So I remember getting out this small cooking booklet that had a few recipes in it and I saw yeast rolls. My mom gave me the hint that she thought I should make them for her since she was such a great mom and I smiled at her and agreed she was and said I would make them. I started to activate the yeast with the wet ingredients and then let it do its thing while my sister and I went to the movies. Later that night we got home I started working on them. Now time I started working on these yeast rolls everyone was sleep except for me of course!

Listen let me tell you honey! I did think they were going to turn out as good as they did until I took those golden brown pillows out of the oven and started to shine them up real nice with butter. But, wait here is the kicker. Little did I know the sweet aroma of those yeast rolls woke up the whole house including Joyce from down stairs ha ha. everyone came in the kitchen to see what I was making! I was so happy that made those!

So with that being said let's jump into this recipe! I do want you to know that this recipe is mine and a recipe I came up with because I had buttermilk and yeast that was about to go bad so I thought of making these.

INGREDIENTS:
1 pkg dry active yeast
3/4 cup warm water
1 tbsp white sugar
1 cup buttermilk
4 tbsp melted  butter
2 tbsp white sugar
1 tsp salt
4 cup flour


First thing you want to do is get the warm water and put it in a bowl. NOTE: BE SURE THE WATER IS NOT HOT OTHERWISE IT WILL BURN THE YEAST AND IT WON'T ACTIVATE! Next you add the package of yeast then sugar. Stir ingredients together and let it sit in a warm dark place in your kitchen for 30 minutes allowing the yeast to activate. As you can see this picture is after 30 minutes. the yeast will start to foam up which is what you want. 

While the yeast is doing it's thing we are going to mix our dry ingredients. Just take the flour, sugar, and salt and mix that up. See how easy it is! don't worry I got your back!

After the yeast has activated and you have mixed your dry ingredients in a separate bowl. now it's time to start mixing everything together! I then use my kitchen aid mixer and pour the yeast/water mix in the bowl. Oh but wait don't forget your buttermilk and butter! mix those two in the bowl next. Then stir them together. OK now it's time to add the dry mix. I like to pour half of the dry ingredients in first, then mix, and then pour the other half next. let the mixer do it's thing until you see the dough pulling apart from the bowl. Once  you see that happen then you turn off your mixer. 

It should look something like this. the texture of the dough should be sticky still. if it is not sticky then add another 1/4 cup of warm water and that should do the trick. Now it's time to proof your dough. all you do is leave the dough in the bowl and cover with a towel. and let it sit in a warm dark area for 30 minutes. NOTE: I PLACED MY BOWL IN TOP OF MY STOVE IN THE MIDDLE BECAUSE I USED IT EARLIER AND IT WAS STILL WARM WHICH ALLOWED THE PROOFING TIME TO GO BY A LOT QUICK FOR ME (20 MINS).

After you let your yeast roll dough proof. It is now time for the fun part! that is kneading the dough. take it out of the bowl and place it on a floured surface. Also flour your hands and be sure to keep the flour by you. Trust me you  are going to need it! Start rolling the dough around with your hands and using flour until the dough stops being sticky and starts to work with you. I say do this for 5-7 minutes. OK you are almost done! We are getting close!

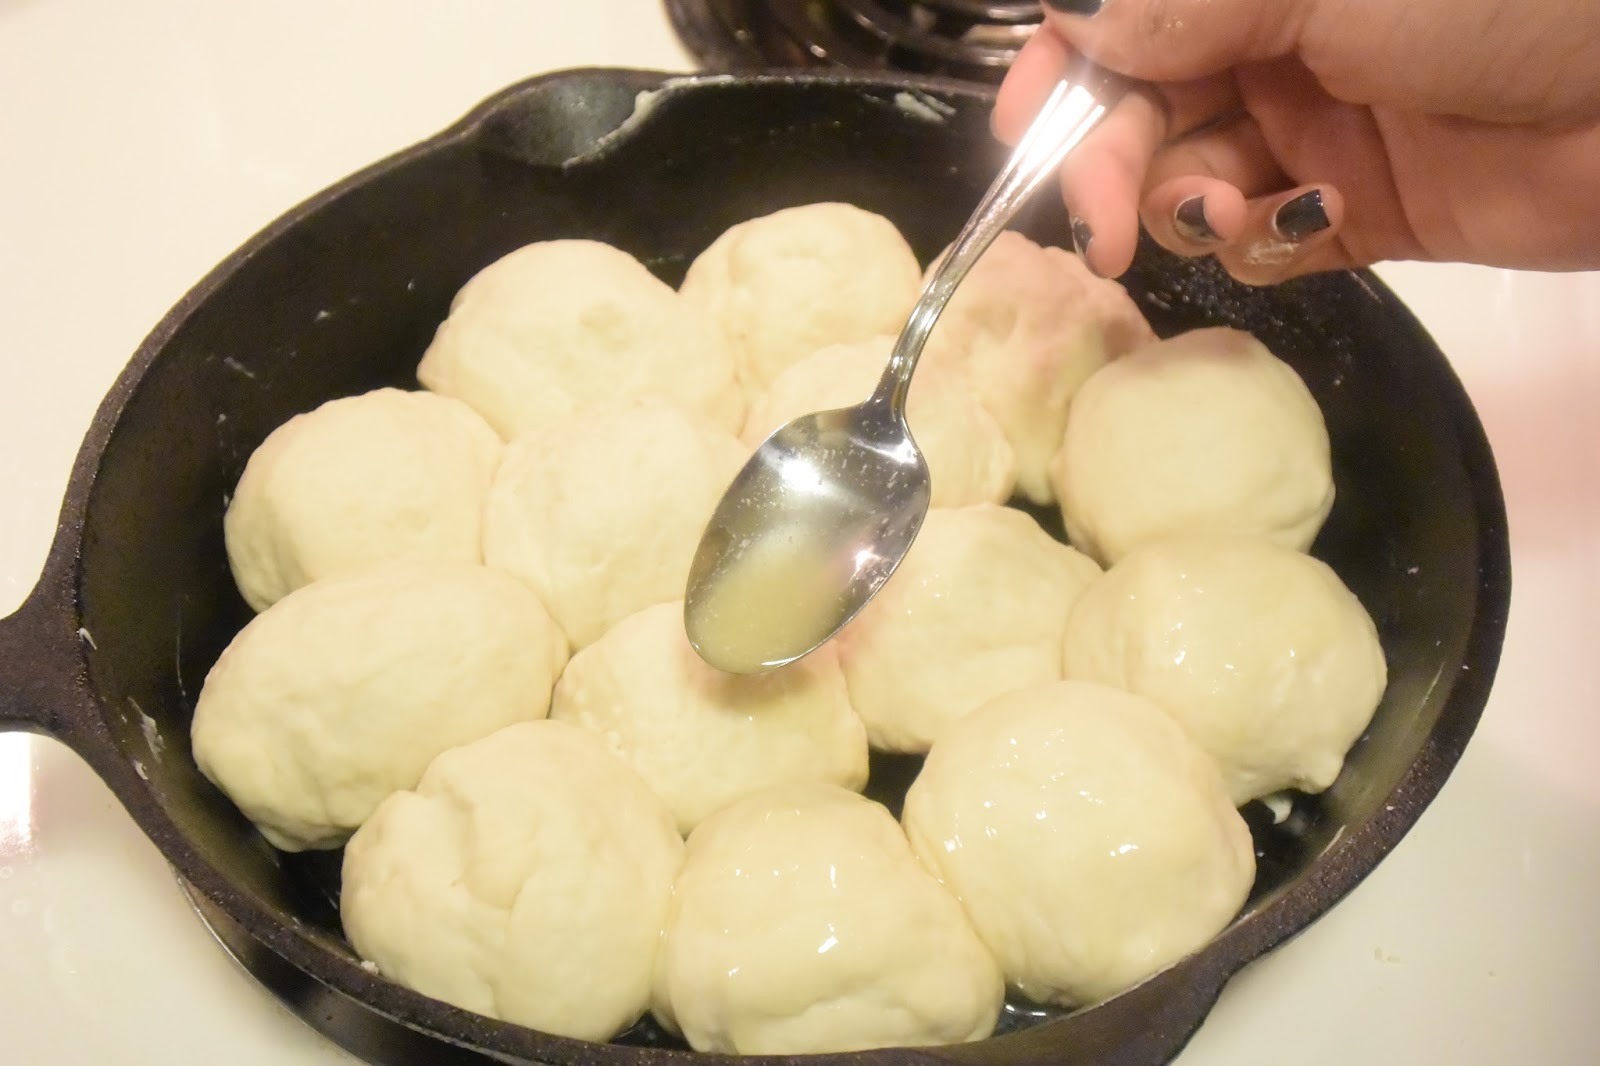
After you kneading the dough, it is now time to roll them babies up into a balls and adding some more melted butter to them. I used my cast iron skillet and I made sure to butter the pan first. all together I made 14 rolls. Now I will say this. the number of rolls you make demands on the size you make them. So the choice is yours! This is also a good time to preheat  your oven to 375.

Now we want to proof these babies. So do like you did last time and cover them with a towel and place them in a warm and dark area. once they have raised and come together, they are now ready for the stove!

Let them cook in the oven until they turn out golden brown. I usually do it the old school way and insert a toothpick in the middle of the roll and if they come out clean then they are done!
Bomb and you got yourself home buttermilk yeast rolls! I hope you all enjoyed my story and this recipe! If you want to see a video of how I made these then subscribe to my channel for notifications! www.youtube.com/c/sayberscookingc

"Love and Good Eats"
-Sayber


Sunday, January 10, 2016

Buttermilk Fried Chicken Sliders

Hey everybody! I hope you all are having a good Sunday! Ok so I just want to let you know that is recipe today is a Touchdown! You will surely get a superbowl ring when you make these puppies! let's get to it!

Buttermilk Sriracha Brine:
 *Buttermilk (enough to cover the top of the chicken tenders)
9 chicken tenders cut in half (17 sliders)
1/4 Sriracha
2 bay leaves

Ok so for this brine we just put all the ingredients into a bowl and cover it and let it sit in the fridge for 24 hours. Now let's say you don't have a full 24 hours to do this well then I say you should at least let it sit in the buttermilk for  no more then 2 hours. 

Tarragon and Lemon Aioli:
 15 tarragon leaves
1 cup Mayo
1 tsp lemon juice
A pinch lemon zest
5 dashes hot sauce
2 tbsp Worcestershire sauce
1  tsp crush pepper

Now I will say as for the tarragon you want to make sure you chop it up to much because that will make it oxidize very quickly! Either rip up using your hands or chop up no more then 3 times for it's full flavor! After that you just mix up into a bowl and put back in the fridge to let the flavors come together!

Granny Smith Slaw:
 1 cup mixed slaw
1 cup red cabbage
1/2 cup thinly sliced granny smith apple
1 cup mixed purple/green kale chopped
1/3 cup cider vinegar
1 tsp ground ginger
3 tsp sugar

Doesn't this look good? All the colors make we wish it was summer already! Oh how I hate the winter! Ok so back to this the recipe! All you do is mix the ingredients together and pop in the fridge to let the flavors come together! NOTE: YOU CAN TOTALLY PREP THE AIOLI AND SLAW A COUPLE OF DAYS AHEAD OF WHEN YOU ARE GOING TO MAKE THE SLIDERS. 

Flour Mixture:
3 cups all purpose flour
1 tbsp salt/pepper mix
1 tbsp ground garlic

Mix all ingredients together and you are now ready to fry the chicken pieces! As for the chicken I start a small assembly line. You want to take the chicken out of the buttermilk brine being sure to get the access milk off of the chicken. I then transfer to a plate. I then have the flour in a container next to the plate of chicken and last another plate next to the container of flour to put the finished floured chicken on.

After that I then start the process of taking the chicken and placing it in the flour being sure to coat the whole chicken, then transfering to the blank plate to let the chicken rest and the flour adhere to the chicken. I then go back and do it a second time. So overall we coat the chicken twice!

Now its time to fry! I use canola oil and pork belly fat (thanks to my chef at work) for the oil to fry  the chicken in. I will say you can use just about any oil you already have!

Once your oil is hot and starts move around in the pot then that means its ready! Or you can do what I do and throw some flour and which it sizzle that means its ready too! Start to drop them suckers in the oil being sure not to drop to much chicken into the pot! 

You can tell when the chicken is down once it floats to the top and has a golden brown color! 


Once every chicken is done now its time to assemble these babies! and bomb you have Buttermilk Chicken Sliders! I hope you enjoyed this recipe today! See you on the next one!

"Love and Good Eats"
-Sayber


Tuesday, January 5, 2016

Prepara Kitchen Tools Ice Sphere


I have a video on a review I did yesterday on the Prepara Kitchen Tools Ice Sphere! If you want to see what I thought about them just click the play button!

Monday, January 4, 2016

Salted Caramel Coffee on the Rock


Ok like i promised here is the video to my salted caramel coffee on the rock! just clicked the play button!

Salted Caramel Coffee on the Rock

Hey ya'll Im back with another drink recipe and I think this one is for sure to please my coffee lovers! Im not sure if you have noticed but I have been trying to get more in tune with the inner mixologist in me ha ha. I said for the new year I wanted to learn more when it comes to cooking and that included drinks as well. I feel that a great drink is just as important as the meal you set on the table and can either compliment the meal  or be a total fail. So here is my take at the a spiked up coffee drink!

INGREDIENTS:

1/2 of a shot glass caramel liqueur
.16 oz whipped cream vodak
1 shot coffee
Splash of half & half
2 tbsp simple syrup
salt (for rim)
caramel for the rim
1 coffee ice sphere 


Ok so the first thing do is go out and buy this little gadget here (if you already don't have one)! This is a ice sphere mold from Prepara Kitchen Tools that comes in box with a set of 4 individual sphere shaped molds to freeze the liquid into these cool balls! I honestly like these things but let me you tell you it was a hassle trying to find them! I searched for two days until I found them at my local Target and when I found them it was the only pack left which i knew was mean't for me! I don't want to go too much into depth about these balls but I do have a review about them on my Youtube channel so be sure to check it out. I will post the video on here later tonight!

Ok back to the matter at hand. So you take you're fresh brewed coffee (once it has cooled down) and you pour the liquid into the sphere molds. You then close up the top and set them in the fridge to let them freeze. NOTE: this part you can do ahead of time.

Now its time to make the drink! You then lightly salt the rim of the rocks ice then you take the caramel sauce and let that drizzle round the rim. take out one of the spheres from the fridge and place it in the glass. 

You then get out you're shaker or in my case a mason jar. Next put some ice into the glass. then pour the liquor first then the coffee, then the splash of half and half,  and now the simple syrup. Now you shake you're life away until you can see you shaker start to frost up or feel the coldness from the mason jar. you then pour the drink over the coffee ball being careful not to pour any ice chips in then and bomb just like magic you are done. Now you  have yourself a Salted Caramel Coffee on the Rock!

I hope you enjoyed this cocktail and also try to make it! If you have any questions or just want to leave a nice comment please do I'll be sure to respond! Ok i'm about to finish this last video and hope to take my tail to bed! Good night!

"Love and Good Eats"
-Sayber


Wednesday, December 30, 2015

ULTIMATE MINI BROWNIES


Hey Ya'll I'm back with another post. So yesterday I made brownies and to my surprise they came out so freaking good. I had to share this recipe with ya'll. I actually got a Ghirardelli Caramel Brownie of chocolate bar for Christmas in my gift bag and although I like chocolate; I am more of a sour candy type of girl. So I was thinking of how I would use this and just like a light bulb that goes off I thought bomb brownies. This is actually what the company uses in their brownies too! so lets get started with the ingredients. 

INGREDIENTS:
 Brownie Mix
  1/2 cup butter
  1/2 cup sugar (room temp)
  2 eggs (room temp)
  3 oz box Nestle Sem-sweet chocolate morals
  3.45 oz bar Ghirardelli Caramel Brownie bar
  1 tsp vanilla
  1 cup flour
  1/2 cup pecans


Ok So first things first be sure to pre-heat the oven to 350` F. We are going to take the first 2 ingredients and mix them together until they are well incorporated. after that then you add the eggs 1 at a time. NOTE: be sure to scrape the side so all the ingredients get mixed together. 


After we do that. then we can that it rest while we get to the fun part. Which is the Chocolate!!
We are going to start by making our own double boiler. Now if you already have one that is fine. To be honest I don't see the point in buy one. It's just added space. Ok so we take a pot and fill it with water a little less then half way. Place it on the stove and let the water come to a small boil. once our water is boiling then we take a bowl (make sure the boil is cooking safe). We want the bowl to be able to sit on top of the pot rim so it will create steam.
Now you add the Nestle chocolate morals and let it start to melt.

Ok so now we are going to act like James from Willie Wonka and open up of Ghirardelli Golden chocolate bar ha ha. 

We then break up the chocolate in small pieces for it to easily melt. you can use a Knife if you want but, I will to show my chocolate some love!

We are going to add that to rest of the chocolate and just a whisk to melt it. 

Once it has melted. we then want to add 1 tsp of vanilla to mix and bomb we done with this part!

This part goes by fast so make sure to pay close attention. All we do is add the melted chocolate to the butter/sugar mixture. Be sure to blend that very well. Once blended then, we are going to add the flour all at once. blended that until well incorporated. and we are almost done...


Now it's time to add the Pecans! oh how I love chocolate and nuts together! Just go ahead a mix that really quick and bomb our brownie mix is done!

take the mixture and with a spoon we are going to drop the brownie mixture into our 4 oz mason jars! Aren't they so cute! I love these mason jars! they are easy to clean out, portable and cute to make a  party especially for New Yours. NOTE: but enough mixture to just cover the top of the jar. 


The mixture will be enough for 5 mason jars. If you are need to make more then just double the ingredients and will come out with 10 jars. Plop these babies in a 350 F oven for 60 minutes.

This is what they look like after 60 minutes of being in the oven. Now the way you can tell if they are done is pretty much how you like you brownies. I like mine between a cakey and fudgey brownie. If you like you'res more cakey then you will cook 10 minutes extra. if you like you'res more fudgey then you will cook 10 minutes less. 

Now I made a quick apple caramel topping with the almonds that you see on top of the brownies. For this part you can do What ever topping you like!

I hope you enjoyed this post! For any questions leave a comment and I will reapply. I hope you like these brownies as much as I did! 

"Love and Good Eats"
-Sayber